Want to see how easy my CD-ROM books are to use? Then you've come to the right place. I'm going to use my Nevada Slot Club Card checklist, as an example, but the exact same prodedures apply to all my CD books.
Here is the good news, about all my CD books: They run under Windows 95, or later, and they are completely stand-alone programs -- they don't add any files to your hard drive, and they don't change any of your Windows settings.
1. Insert a CD book into your CD drive. It should start automatically, unless you have the CD AutoStart feature disabled. This is a big program, so it can take 30 seconds, or more, to load.
2. If you see the screen below, go to step 3. If not, you can manually start the program by pressing the Windows [Start] key, which is at the bottom left of your Windows desktop. Select the [Run] option, and type in D:STRIKES and press the [Enter] key. After about 30 seconds, the program should load. Of course, if your CD drive isn't D, then use whatever letter it is.
Note: When you run my CD book program, if the screen below is larger than what you can see on your monitor, meaning the INDEX button is totally off the screen, then go to the Screen Settings Tutorial, at bottom of this page.
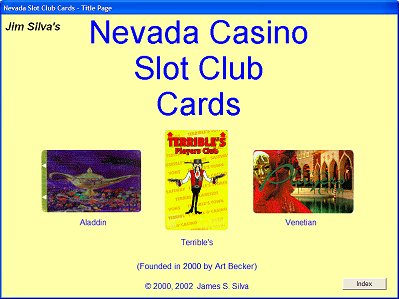
This is the title screen. It shows slot cards from the Aladdin, Terrible's, and the Venetian
The image is about half size from the real thing
3. After the program starts, and you see the screen above, you have two options. The first option is that you can right-click anywhere on the screen, and the program will end. The second option, is to left-click on the INDEX button, at the bottom right of the screen. Clicking on the INDEX button will take you to, and you better be sitting down for this news, the INDEX!
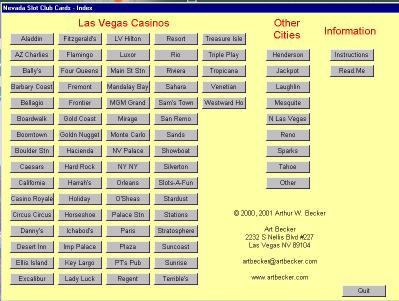
4. As you can see, the Index consists of all the Las Vegas casinos, with slot club cards, plus a list of the other cities, that have casinos with slot club cards. This is where the instructions get tricky. If you want to see which slot club cards have been issued by a casino, you have to use your mouse to click on the appropriate button. If this gets too complicated, try reading paragraph 4 again. However, let's assume you have already mastered this technique, and let's imagine that you clicked on Las Vegas' Golden Nugget casino, which is downtown. You'll see the screen below.
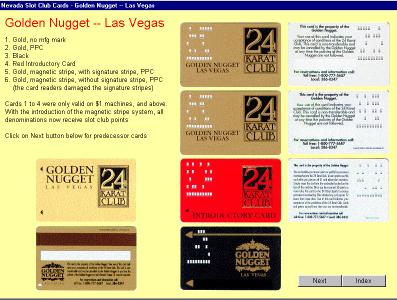
Slot Club Cards Issued By The Golden Nugget
5. The upper left of the screen lists the slot cards that have been issued by the Golden Nugget. There have been six different varieties. But, wait! How come there are only four and a half sets of photos? Well, for one thing, even a super-collector like myself doesn't have all slot cards ever issued. However, in the case of the Golden Nugget, I do indeed have all the cards. However, there is only an easily recognized difference between card #5 and card #6. Cards #1 to 4 had Hollerith holes in them. But, this is old technology (actually dating back to when Herman Hollerith developed the system, for use in the 1890 census -- and it's the same 110 year old technology which they couldn't get to work last year, during the Presidential election, but that's another story), so the casino wanted to finally go with something newer. On the reverse of card #5, there is a magnetic stripe, plus a white signature stripe. However, the casino soon found that their new mag stripe equipment, inside the slot machines, immediately damaged the white signature stripe. They got rid of the signature option, and, hence, issued card #6, which doesn't have a signature stripe on the reverse. The listings clearly tell you about this, so there's really no need for a photo.
6. If you look closely at the bottom right corner of the screen, you'll see two buttons. Most screens only have one, and that one returns you to the INDEX, where you can select another casino to check out. The second button on this screen says NEXT, which means there's more to the Golden Nugget listings than one page. Let's assume you remembered how to navigate the pages of my CD book, and have clicked on the NEXT button. You'll see the screen below.
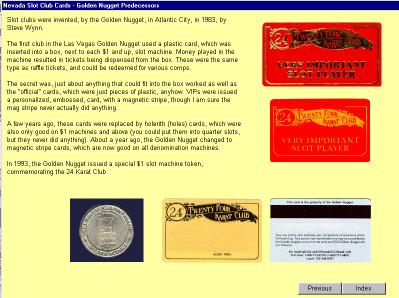
Additional slot club card info about the Golden Nugget
7. Did you know that the Golden Nugget, in Atlantic City, inaugurated the first slot club card, back on January 24, 1983? For the tenth anniversary of the 24 Karat Club, the Golden Nugget, in Las Vegas, issued a commemorative $1 slot token. That's a photo of it, on the left. Interestingly, the token was minted by Nevada Coin Mart, which also produced the early silver strikes, which have the NCM mint mark.
At the top of the page are two of the very earliest Golden Nugget slot club cards. Hey, how come they aren't listed on the previous page? Well, it's because they don't fit the official (meaning the one I made up) definition of a slot club card. You see, they are merely plain pieces of plastic, with the Golden Nugget info, printed in gold leaf. There were special card readers, on the sides of $1 and up slot machines. If you inserted one of the cards into the slot, as you played, little tickets were dispensed from another part of the device. They looked like your standard raffle tickets, and could be turned in for comps. The open secret was that ANYTHING you could cram into the card slot would work just as well. You could use your drivers license, credit card, or a piece of cardboard. The "reader" was simply a microswitch, which essentially said that the player wants those little tickets.
This is where it gets amusing. The Golden Nugget wanted to impress its VIP players with something more than just a plain piece of plastic. So, they came up with the golden card, shown above. The player's name was embossed on it, and the card had a magnetic stripe. The stripe, of course, performed absolutely no function, at all, but it looked cool. It wasn't until many years later that Golden Nugget slot club cards actually had real mag stripes.
8. Now. let's recap how to use my CD books. You use your mouse to click on the button of where you want to go.
9. Any questions? Please send me an email.
1. It's easy to change your screen settings. There are two main settings you can change. The first is resolution, meaning how much information you can see on your screen. The unit of measure is the pixel, which is the smallest dot that you can see on your screen. Windows used to have 600 x 400 as their default setting, and many computers are still set up for this low-resolution mode. Almost certainly you can do better, and my CD book programs require that your resolution be at least 800 x 600. Here's how to change your settings, so that you can see more on your screen:
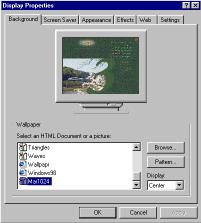
2. Go to your computer screen's desktop. This is where you have all the various program icons, and maybe a wallpaper background. It should be the screen you see, after you boot your computer. Move you mouse pointer to a blank spot onthe screen (any place where there isn't an icon). Then right-click your mouse once. You should see the following menu pop up, in the middle of the screen:

3. Select the bottom option Properties. You'll then see the following screen:
4. Select the tab marked Settings. You'll see this screen:
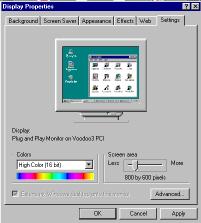
5. This is where you'll make one or two changes. The most important one is marked Screen Size. You need to move the arrow/slider to where it says at least 800 x 600. Note that if you have a 17" monitor, you can probably choose the 1024 x 768 selection (if you have a bigger monitor, then go for an even bigger size). While you are here, you might want to change the Colors setting to something more than 256 colors. After you've made the change, click on OK. You should be given the option of changing the screen setting without rebooting, so try that, and see if it works. If not, then you have to reboot.
6. It depends on your color graphics card, inside your computer, which screen size and color settings will work best. If you have a problem, just reset the settings to what they were before the problem. You'll probably be amazed at how much better your computer screen looks, if you need to make these adjustments.
Go to the Silver Strike Information Page
Go to the Silver Strike Checklist Page